 As I mentioned on my binocular
telescope page, I wasn't really eager to buy two commercial Crayford
focusers for that project. There was the expense, for one, but also the
weight. So I was looking for a cheap, light-but-sturdy design for a
homemade Crayford focuser. I had already made a lightweight focuser for
my 12.5" trackball, but I didn't
think that design would be rigid enough under the weight of a diagonal
and an eyepiece.
As I mentioned on my binocular
telescope page, I wasn't really eager to buy two commercial Crayford
focusers for that project. There was the expense, for one, but also the
weight. So I was looking for a cheap, light-but-sturdy design for a
homemade Crayford focuser. I had already made a lightweight focuser for
my 12.5" trackball, but I didn't
think that design would be rigid enough under the weight of a diagonal
and an eyepiece.
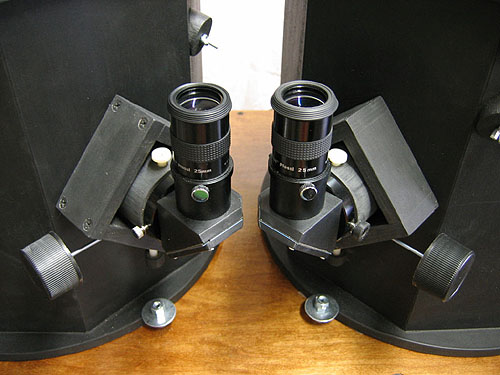
I had chosen a boxy, rigid design for the binocular scope, so
my thoughts naturally gravitated toward a boxy focuser to go with it. It
occurred to me that a square turned 45 degrees would give me two flat
surfaces to put the bearings in and a vee at the bottom that would hold
the drive shaft close against the drawtube. The bearings only need to be
an inch or so apart, so the focuser body could be pretty low profile.
The wide square footprint would make it pretty stable when mounted to
the side of a rigid secondary cage.
It wouldn't be a two-speed design, but if I used a thin enough
rod for the drive axle it would have a fairly fine motion. I
experimented with various wires and rods and eventually decided that a
#2 knitting needle would be just about right. Knitting needles are
really stiff and light for their size, and even though a #2 is pretty
small, it's surprisingly rigid. Thicker knitting needles would be even
stronger, but would give me a coarser focus action because of their
larger diameter.
PVC pipe makes great drawtubes. It's rigid, lightweight, and
the interior diameter is just a nudge over 2". It's easy to shim it to
exactly 2" with adhesive labels placed one at a time inside the tube
until a 2" eyepiece or 1.25" adapter is snug. Plus it comes in black, so
you don't need to paint it (or worry about paint flaking off it).
I had some carboy caps that make good knobs. They're fairly
large in diameter (1.6") so that adds to the fine-ness of the focus
control. All in all it seemed like a pretty robust design, so I gave it
a try.
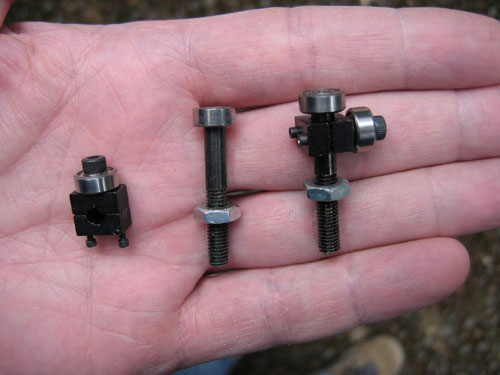 The bearings came from Surplus Shed.
They come two to a set, one on a long shaft and one on a clamp block
with a hex-head screw through the center. For these focusers, I used the
ones held on by screws because they were easy to remove and left an open
axle hole. (I used the long ones on the focuser I built for my 12.5" trackball.)
The bearings came from Surplus Shed.
They come two to a set, one on a long shaft and one on a clamp block
with a hex-head screw through the center. For these focusers, I used the
ones held on by screws because they were easy to remove and left an open
axle hole. (I used the long ones on the focuser I built for my 12.5" trackball.)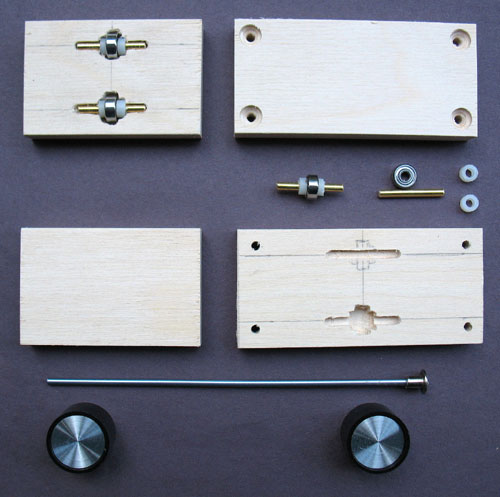 The bearings stand out about 1/8" from the axles, so I
made the wooden frame just big enough that the 2" PVC pipe (with an
outside diameter of 2.38") would clear the wood by 1/8" on all sides. I
used half-inch Baltic Birch for the frame.
The bearings stand out about 1/8" from the axles, so I
made the wooden frame just big enough that the 2" PVC pipe (with an
outside diameter of 2.38") would clear the wood by 1/8" on all sides. I
used half-inch Baltic Birch for the frame.I centered the bearings in the two sides that would hold them, and placed them an inch apart. I gave them 3/8" of clearance from the center of the bearing to the edge of the wood, so the wood is 1.75" wide. That's the length of the focuser body when it's installed on the telescope, so it's a pretty low-profile focuser.
The axles are 1/8" brass rod. I'm sure they don't have to be brass; that's just what the hardware store had on hand.
Cutting the notches for the bearings and the channels for the axles seems really tricky at first, but after gouging one out with a wood chisel and a pocket knife I hit upon a much simpler method: Bust the bottom off a drill bit, leaving about a half inch of drill spiral. Grind the broken edge flat, then put it in a drill press and use it as a router bit. The bit stays put while you move the wood beneath it, and you use the drill press wheel to lower the bit into the wood. It's surprisingly easy to carve out a decent channel that way. The bearing recess should be big enough so the bearing doesn't touch any wood. The axle channel should be snug and as straight as you can make it, and just deep enough for the axle to lie flush with the surface of the wood. If you dig too deep, you can shim it, and you should. You want all the bearings to be the same height off the wood so your drawtube will stick out of the focuser at a 90-degree angle.
The nylon spacers are there to keep the bearings centered in their cutouts. It's nearly impossible to get everything exactly the same dimension, so you'll have to cut each spacer to fit the spot it goes in. Make them good and snug. It's fine to pinch the bearing's inner race tightly in place; it's just the outer race that needs to be free to move.
The knobs in the photo aren't the knobs I wound up using. Go for bigger knobs; they'll give you better focus control.
 Drill the holes for the knitting
needle so the knitting needle will be snug against the drawtube without
flexing. Make the hole diameter fairly snug, too. Measure twice, drill
once. If you mess up, you can turn the hole into a slot, but avoid
widening the hole. A wide hole will let the knitting needle creep
forward and back along with the drawtube when you focus, and you'll get
a "rubbery" feel. This can be shimmed out with paper wrapped around the
knitting needle where it goes through the hole, so it's not a big deal,
but try for a snug fit if you can.
Drill the holes for the knitting
needle so the knitting needle will be snug against the drawtube without
flexing. Make the hole diameter fairly snug, too. Measure twice, drill
once. If you mess up, you can turn the hole into a slot, but avoid
widening the hole. A wide hole will let the knitting needle creep
forward and back along with the drawtube when you focus, and you'll get
a "rubbery" feel. This can be shimmed out with paper wrapped around the
knitting needle where it goes through the hole, so it's not a big deal,
but try for a snug fit if you can.
If you're not using heavy eyepieces, you probably don't need
the nylon screws going up from the bottom, but I found the knitting
needle to be just a little too flexible for the weight of a diagonal and
an eyepiece. It was easy enough to drill a hole and tap threads for a
1/4" x 20 bolt, and the nylon bolt end against the smooth knitting
needle adds no friction that I can feel to the focus action. It just
forces the knitting needle against the drawtube and the drawtube against
the bearings, totally eliminating any flex. The extra force will also
help eliminate slippage when the focuser is pointed straight upward.
Since these focusers were going side-by-side on a binocular
scope, I only put knobs on the outsides. Most people will want a knob on
both sides. I used a hole saw to cut a wooden plug to fit inside the
knob, and a drill press to make sure the hole for the knitting needle
was straight so I wouldn't get a wobbly knob. But who cares, really? A
wobbly knob still works, and adds character.
Make the drawtube longer than you think you'll need, just in
case you need more focuser travel than you thought. When you figure out
how much travel you actually need, you can cut the tube off so none of
it sticks into your light path.
After you've done that, put a couple of tiny pan-head screws
in the tube so they'll hit the knitting needle before your drawtube runs
off the bearings. That way you won't be dropping your drawtube and
eyepiece on the ground (or worse, on your primary mirror!) by cranking
too far.
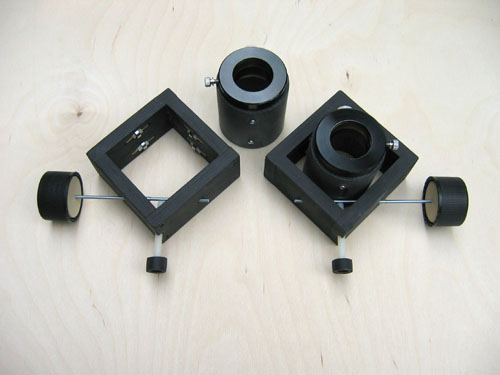
One of the neat things about the square design is that the
corners of the squares provide nice nooks for the eyepiece and eyepiece
adapter set screws to slide into. That helps with low-profile
installations. If you wanted to really go low-profile with this design,
you could probably space the bearings 3/4" apart instead of 1" and mount
the bearings right at the edge of the frame, reducing the frame to
a 3/4" thickness. Given that you can make the drawtube any length you
like, you can have as much focuser travel as you want no matter how
narrow the frame.
That's pretty much the focuser. I've been using the above pair
on my binocular scope for quite a while now and really like them. I
haven't yet found any design elements that need improvement. It seems to
work really well, for a fraction of the cost of a commercial Crayford
focuser.